Huma is working with various NHS trusts and global healthcare systems to bring connected care to patients and clinicians. Our solution helps care teams monitor patients remotely, providing early intervention opportunities and helping avoid unnecessary hospital admissions. Huma gives the information needed to guide patients through their care plan.
GET STARTED
Setting up the clinician portal
Signing up for the first time
To create an account with Huma, you will need an invite from an admin. The admin will receive the initial invite from the Huma team. If you want to access Huma, please speak to your team lead.
Fill in your personal details, including full name, email and password.
As part of our 2 factor authentication process, you must first verify your email by clicking the link emailed to you and then enter the 6 digit code sent to your mobile number via text message.
Signing in
Begin by clicking "Sign in"
Enter your email and password. If you select "Remember me" you will not have to complete the 2 step verification for another 2 weeks.
To verify your account and login successfully, enter the 6 digit code sent to your mobile number via text message.
GET STARTED
Navigating the clinician portal
Homepage
When you first log in, your ‘patient list’ will be sorted by RAG (red, amber, green) flag status.
You can then manually filter your patient list – e.g. those who require admission, those who you need to continue to monitor, those who are currently inpatients, the number of symptoms they have, their blood pressure, heart rate, oxygen saturation, and temperature readings.
Patient status
The patient status is not set by default. You can change the status of a patient by clicking the three dots sign on the far right.
If you are concerned about a patient, you can change their status to ‘Flagged’ or ‘Needs admission’.
‘Inpatient’, ‘Recovered’ and ‘Deceased’ statuses should be used if a patient is no longer part of the active remote monitoring. These three statuses will indicate that the patient has been discharged from the programme.
IMPORTANT NOTE: If a discharged patient enters new information in the app, in line with default ‘Any status’ and ‘Priority’ sorting, the patient will appear at the top of your list with a green icon beside their name. It is important to ask discharged patients to stop entering new data and to delete the application from their phone.
GET STARTED
Invites and permissions
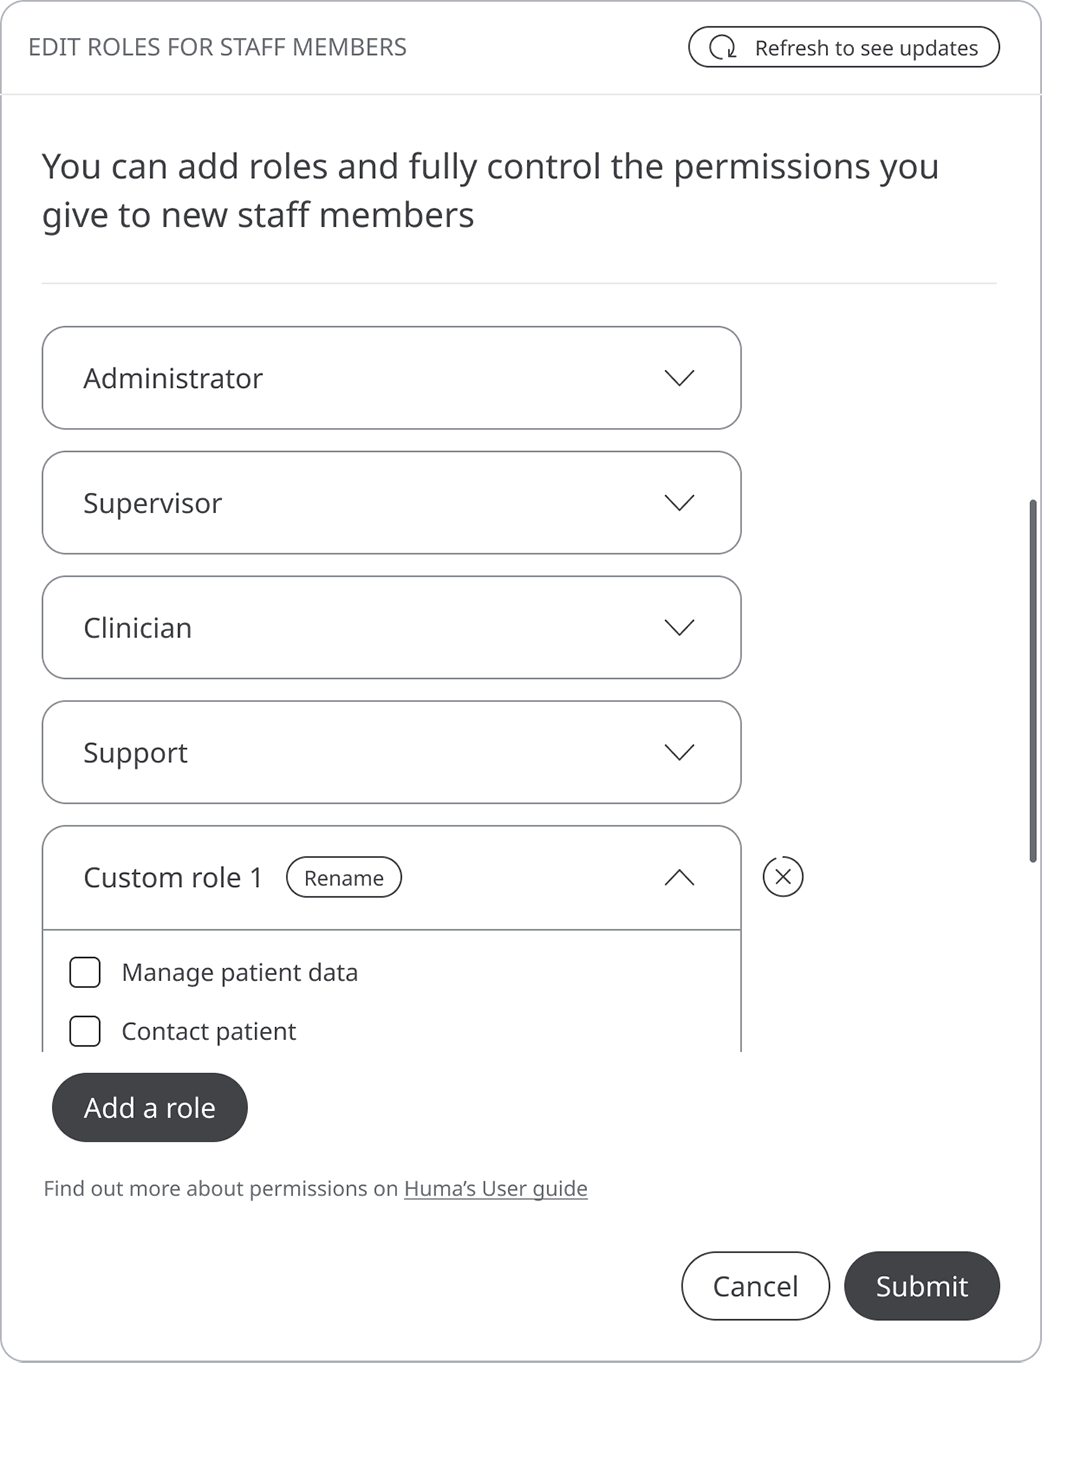
Setting permissions
These are some of the default roles on the platform:
Administrator – an administrator has full access to the administration of the platform. However, they can’t edit patient data or interact with patients. We expect this to be a role used by your IT team.
Clinician – the ‘clinician’ role can view, manage, and export patient data. They can also offboard and contact patients. This role may be best suited for doctors and nurses.
Supervisor – a supervisor can view and export patient data and view staff members in an organisation. Your hospital managers may be best suited for this role.
Support – the ‘support’ role cannot manage patient data, but they can view it. They can also contact patients. This role may suit physiotherapists, paramedics, etc.
Custom role – custom roles can be created with a combination of permissions to suit your needs. However, we encourage people to use one of the predefined roles.
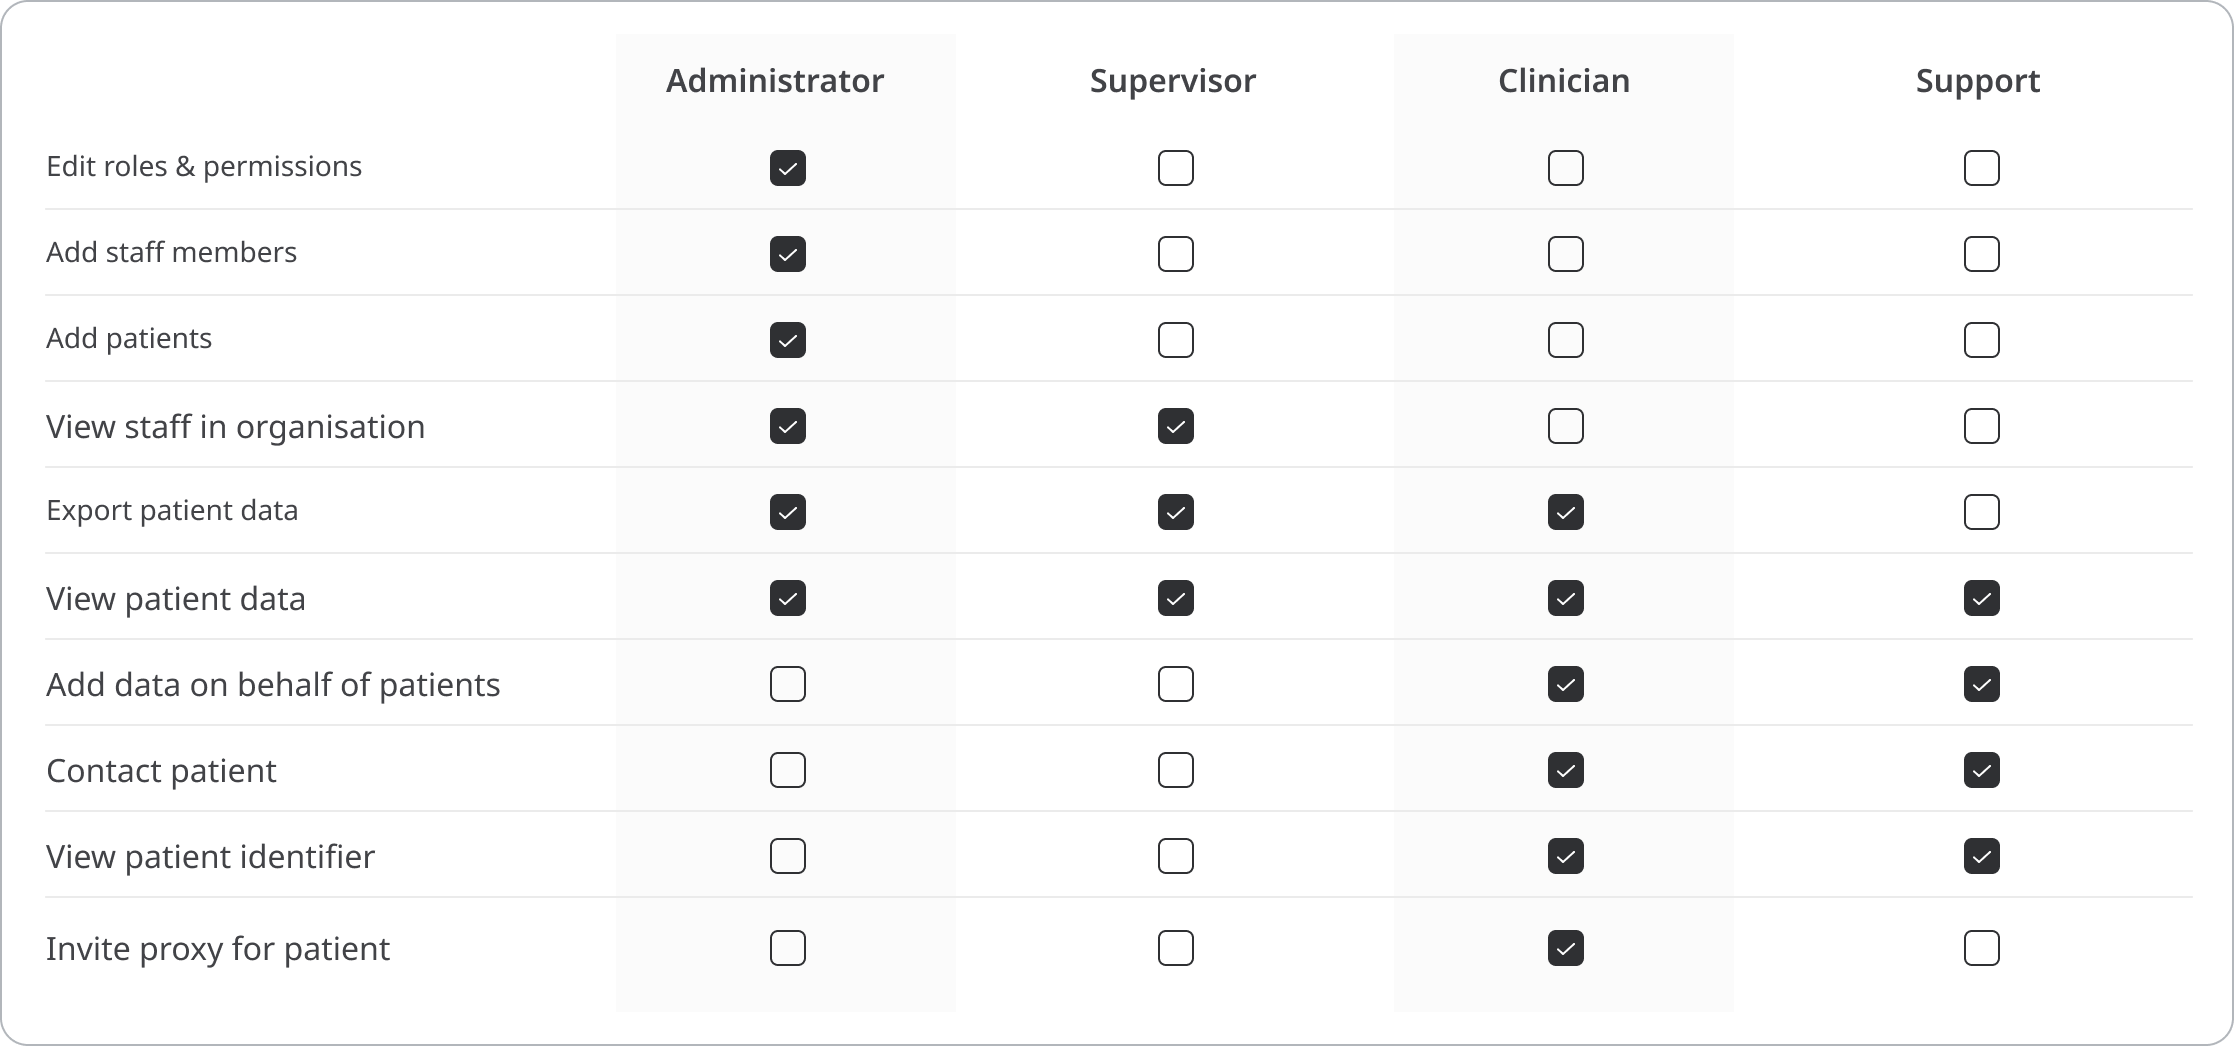
What each permission means
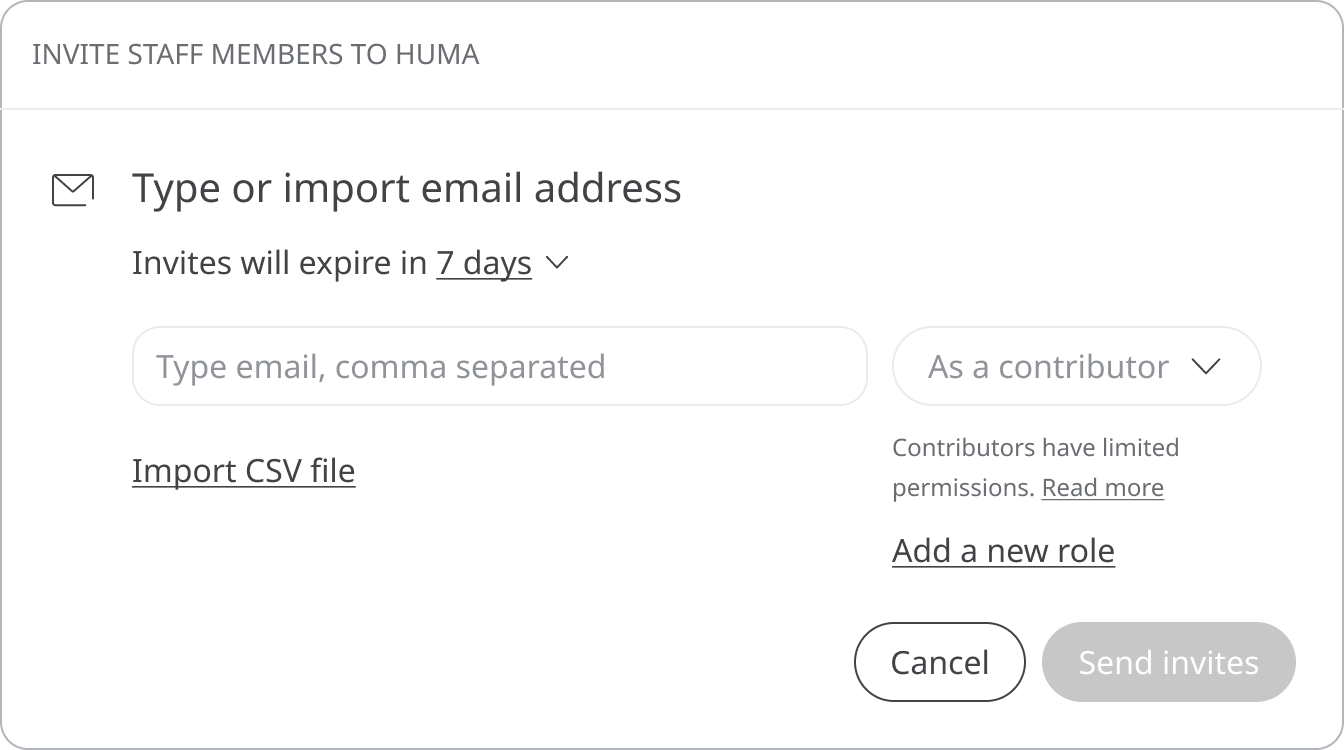
Inviting staff members
Administrators are allowed to invite other staff members, and are responsible for ensuring adherence to the User Agreement/T's and C's. To invite other staff members, head to your Profile dropdown, and select "Invite staff members". You can set their role from the invite modal.
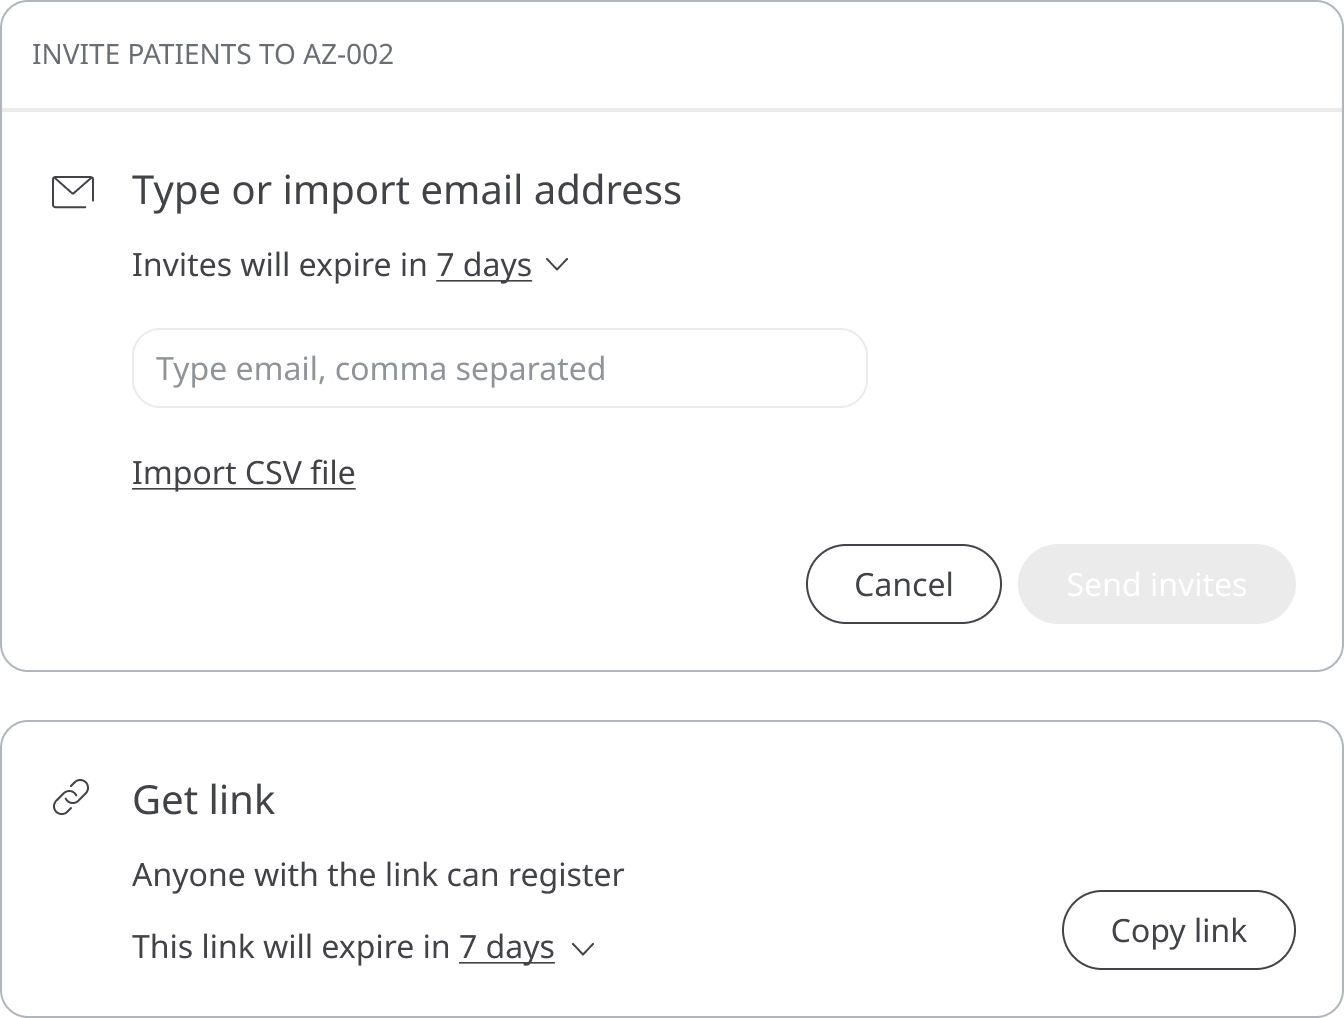
Inviting patients
Administrators are allowed to invite patients directly through the portal. Navigate to the top right-hand corner of the screen and click on your name. You will see a new option named 'Invite patients'. Enter the patient's email address (individually or by CSV upload), tap the enter key on your keyboard and then click on 'send invite'. The patient will then receive an email instructing them to download the Huma app and activate their account.
HOW IT WORKS
Clinician profile
In this section, you can edit your personal details such as your mobile number and address. You will also be able to see the patients that have been assigned to you.
HOW IT WORKS
Patient information
Navigation
When you click on a patient, you’ll be taken to their profile. By clicking on the patient profile in the top left corner of the dashboard, you’ll see 4 icons:
Patient dashboard
This takes you to the patient’s dashboard containing their modules
Patient dashboard
This takes you to the patient’s dashboard containing their modules
Patient dashboard
This takes you to the patient’s dashboard containing their modules
Patient dashboard
This takes you to the patient’s dashboard containing their modules
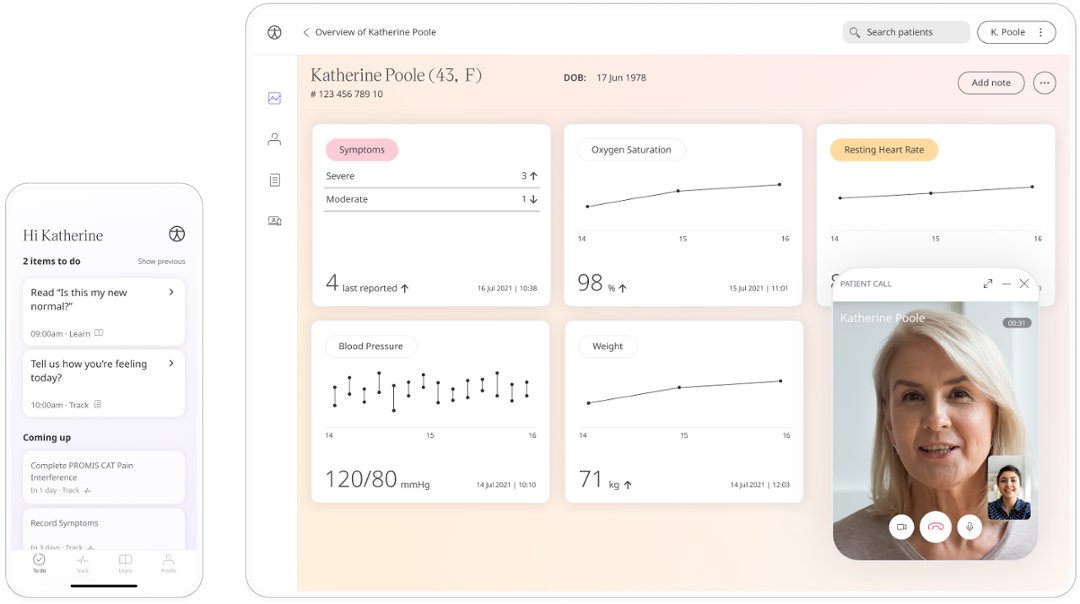
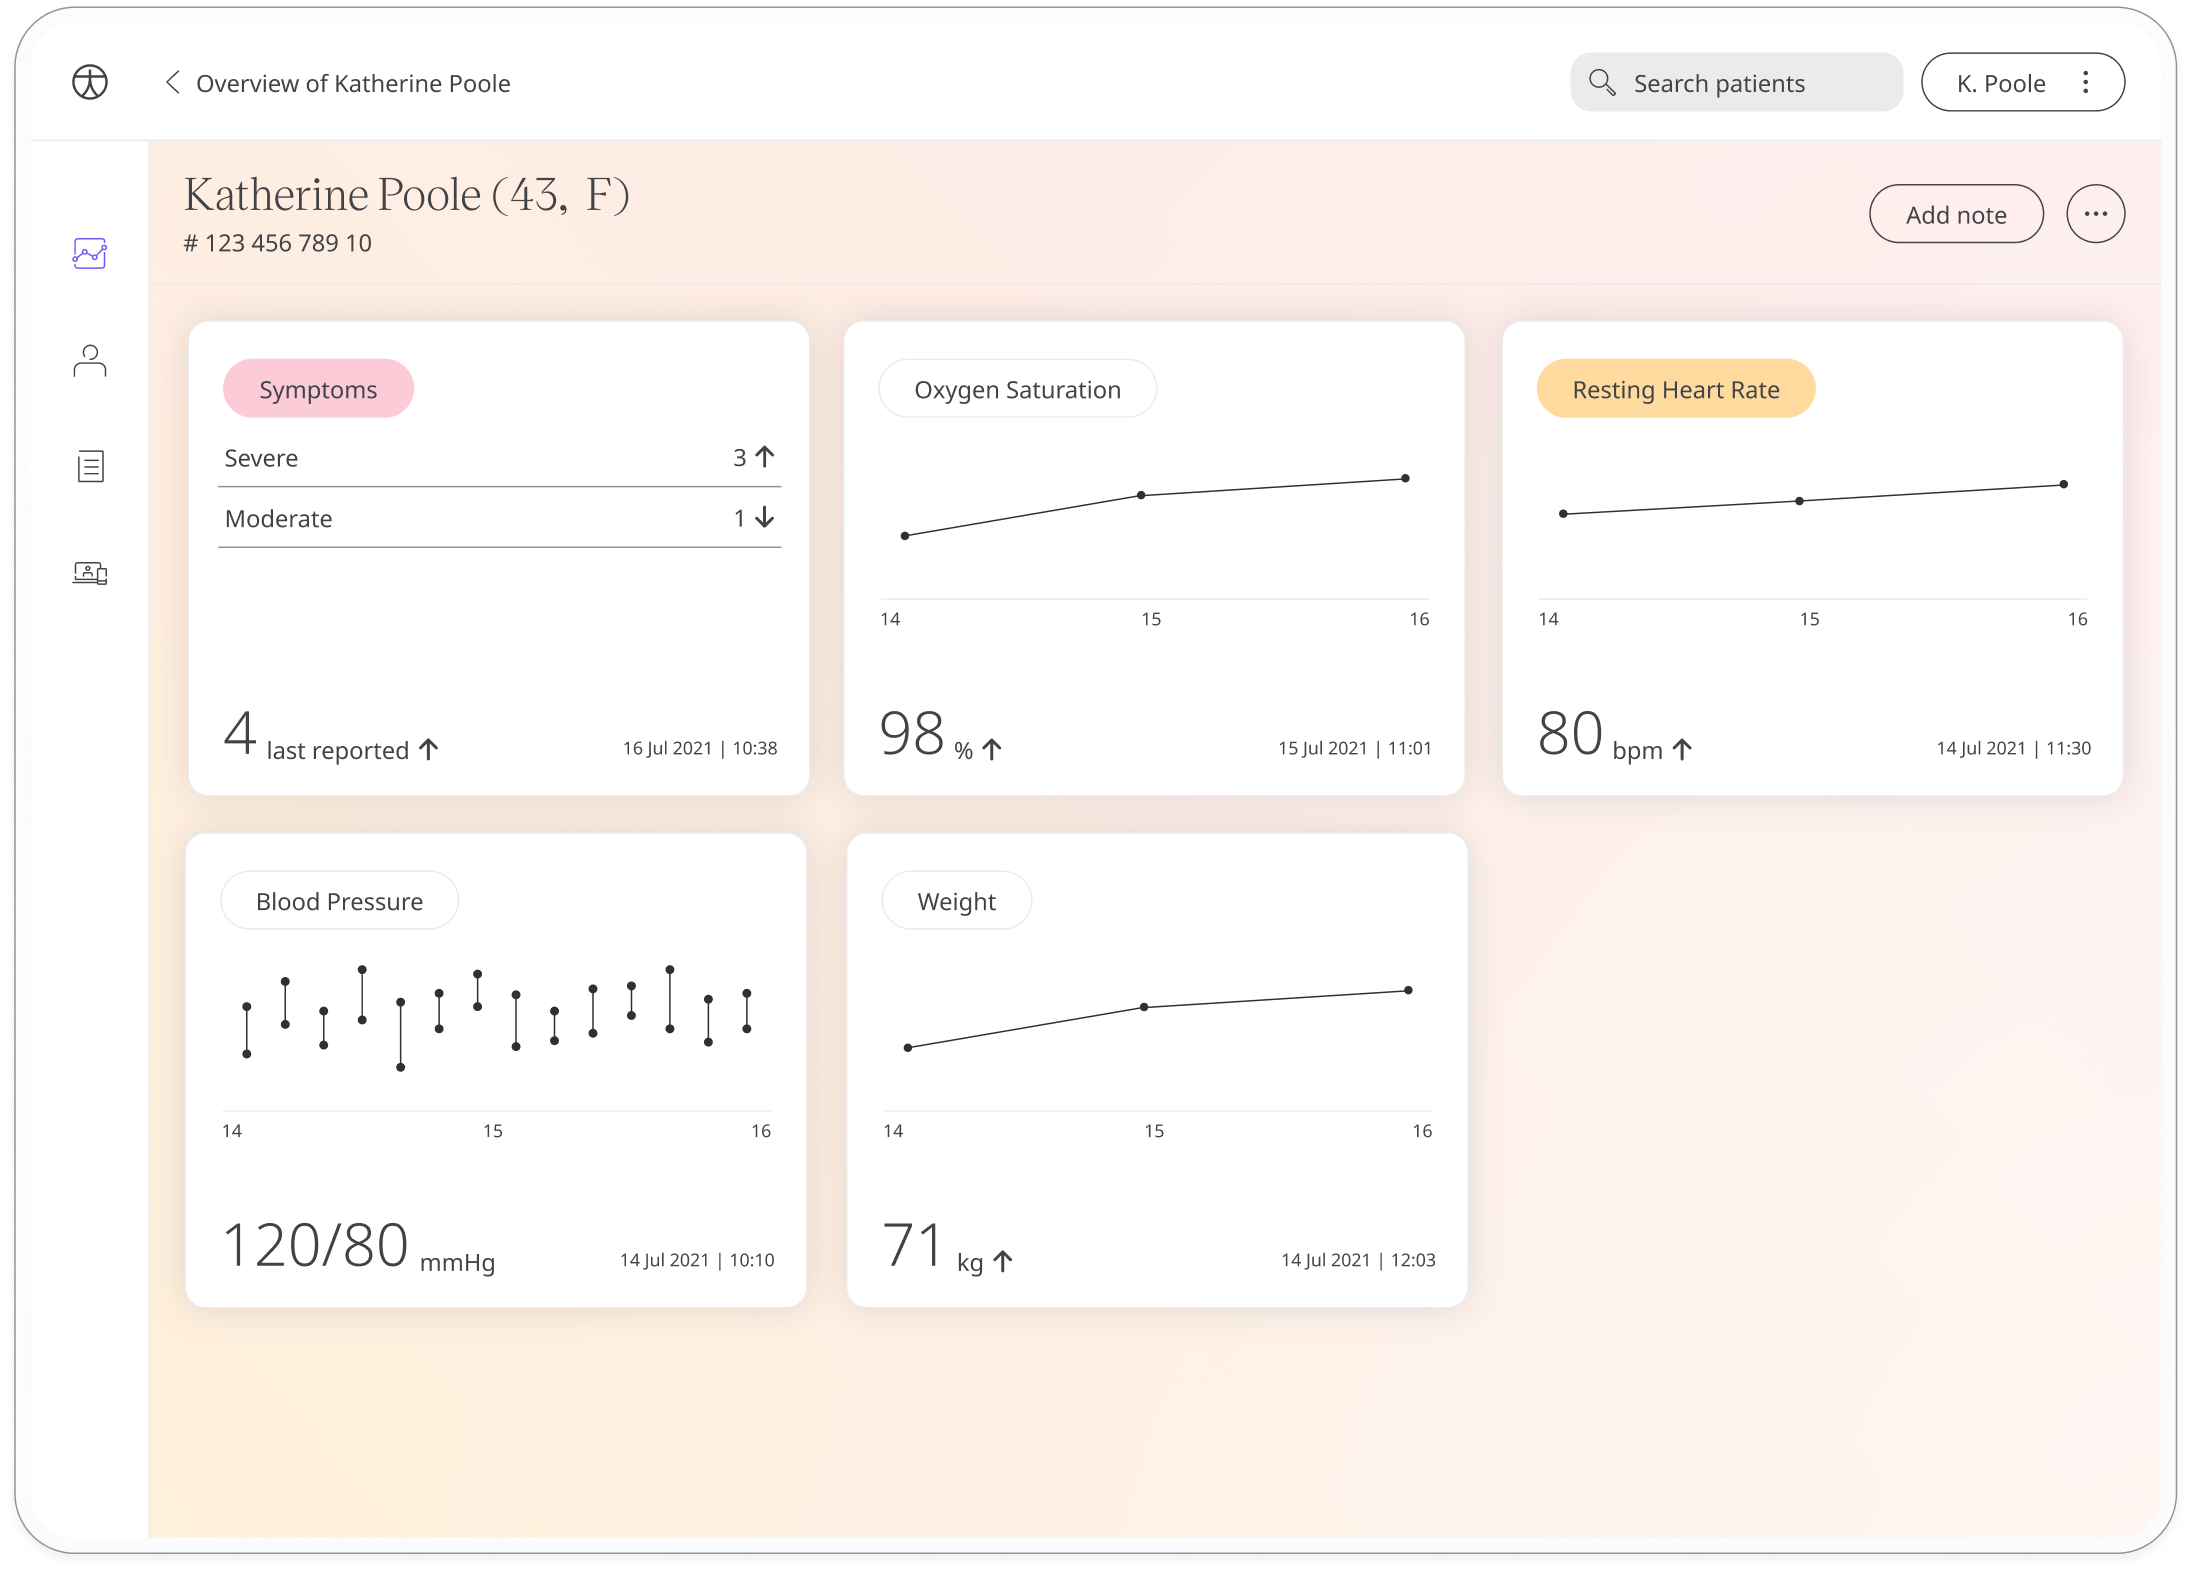
Patient dashboard
This module shows the patient’s individual modules and their most recent health records, including questionnaires that the patient has completed. When you click on the module or questionnaire you will be taken to the individual results of the patient’s entries.
Physiological parameter ranges are colour-coded in yellow or red to assist in efficient prioritisation of patients. Any data entered that isn't highlighted in red or amber will not be flagged to you.
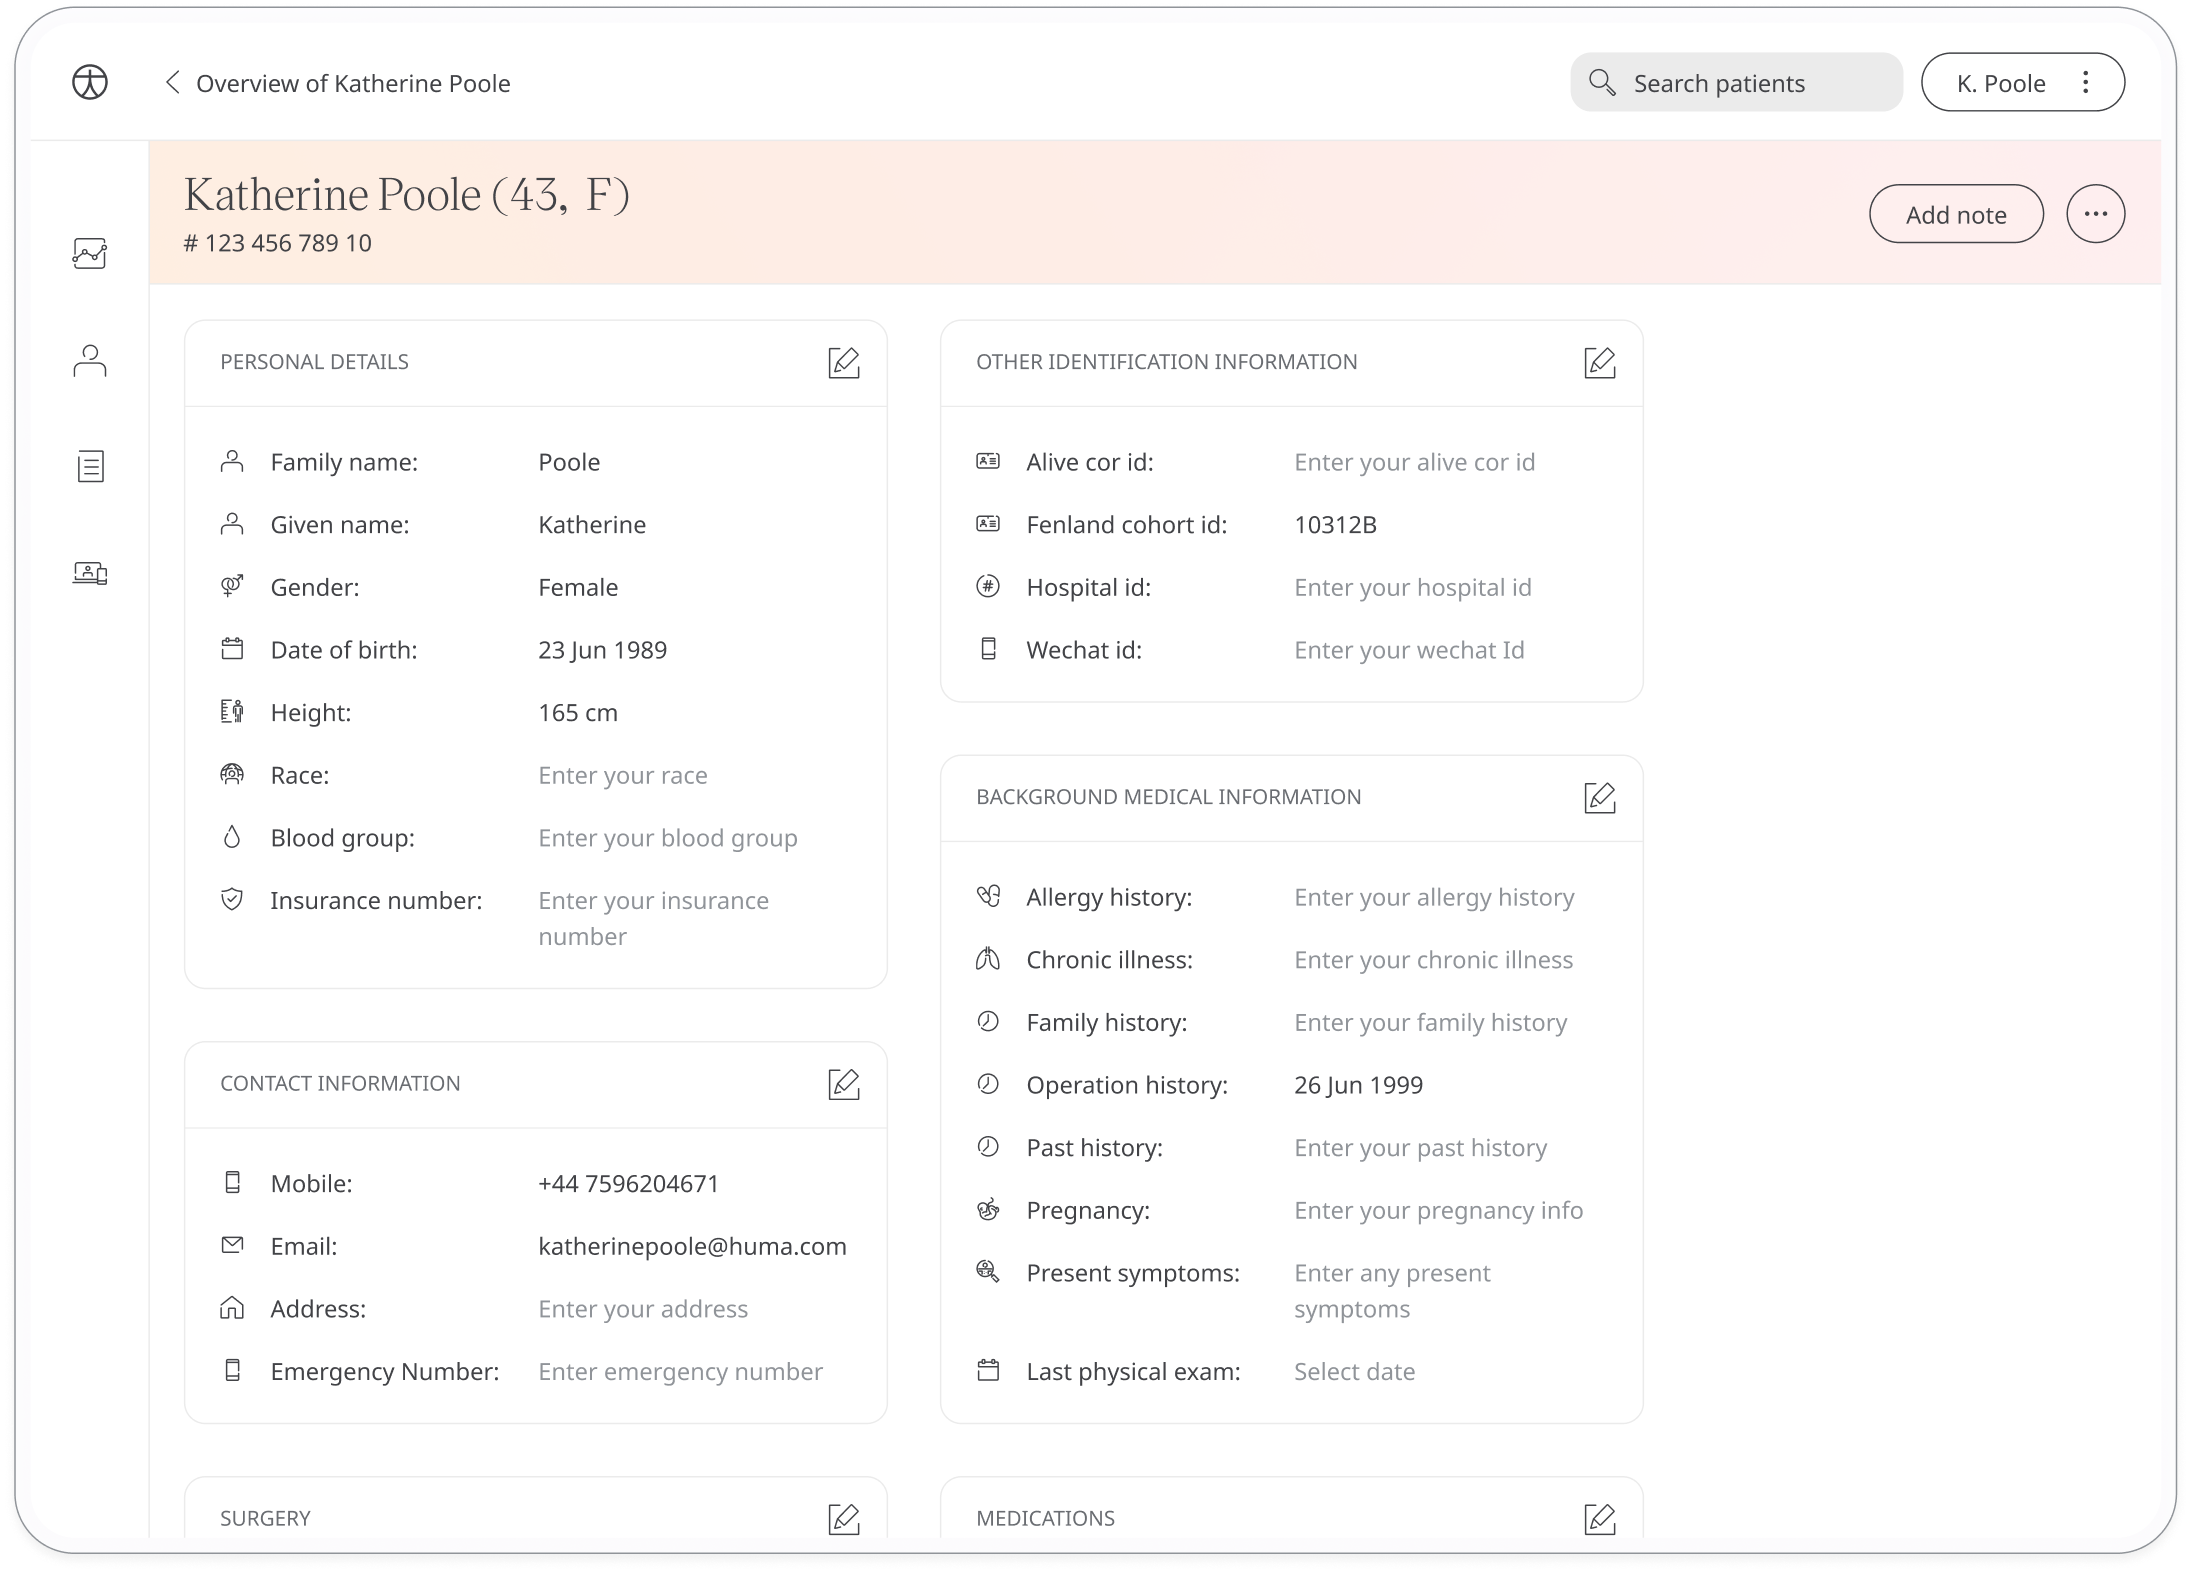
Patient profile
This module shows the patient’s details and background information such as date of birth, gender, and email/phone number. You will have the ability to edit the information if needed and input Patient Identifier information, such as their NHS number. The clinician will also be able to filter the patients in the list by selecting ‘My patients’.
Patient notes
Once you have reviewed a patient’s new data submissions, you must enter a note and click ‘Publish’, which will act as confirmation of your review and will be saved with your initials, time and date stamps.
Once you have done this, the flags appearing on the left side of the name of the patient will disappear, and the patient will no longer appear at the top of your list.
The patient will also receive a ‘seen’ message on their app to indicate that someone from the clinical team has seen and reviewed the data submissions.
.png)
HOW IT WORKS
Modules
Questionnaires
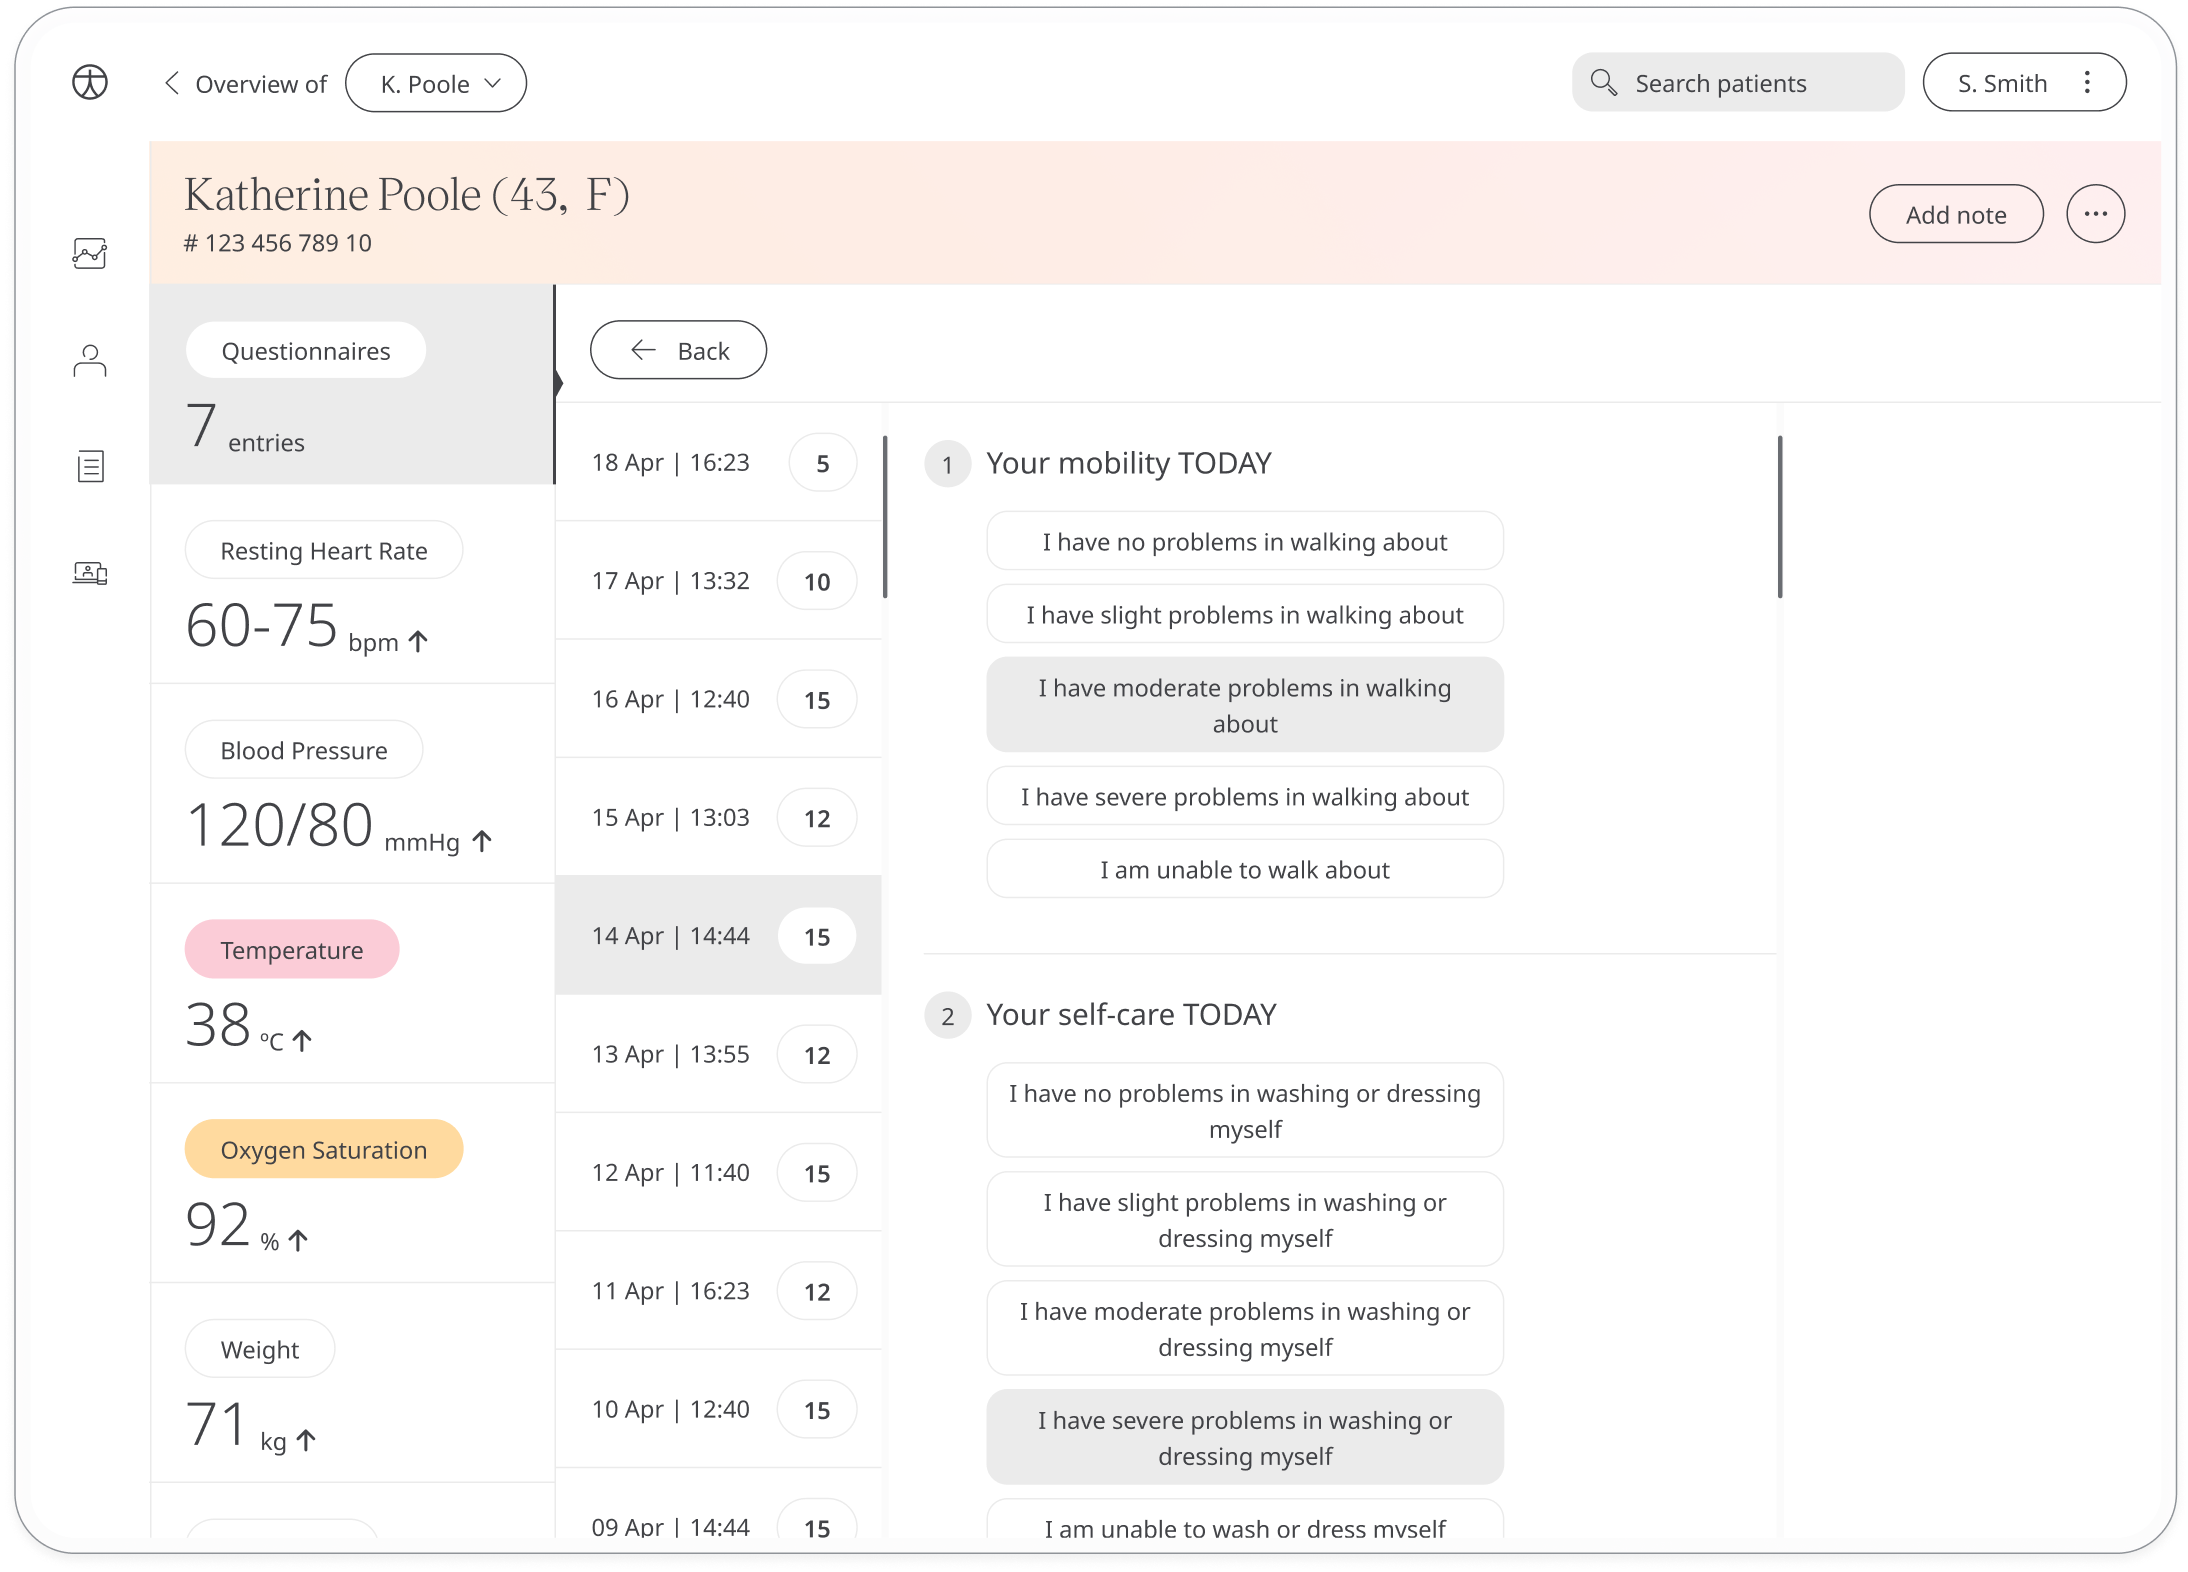
Traffic light system
Some of the graphs will have a “traffic light system” to help you navigate through the patient’s well being. The thresholds would be configured based on requirements per deployment.

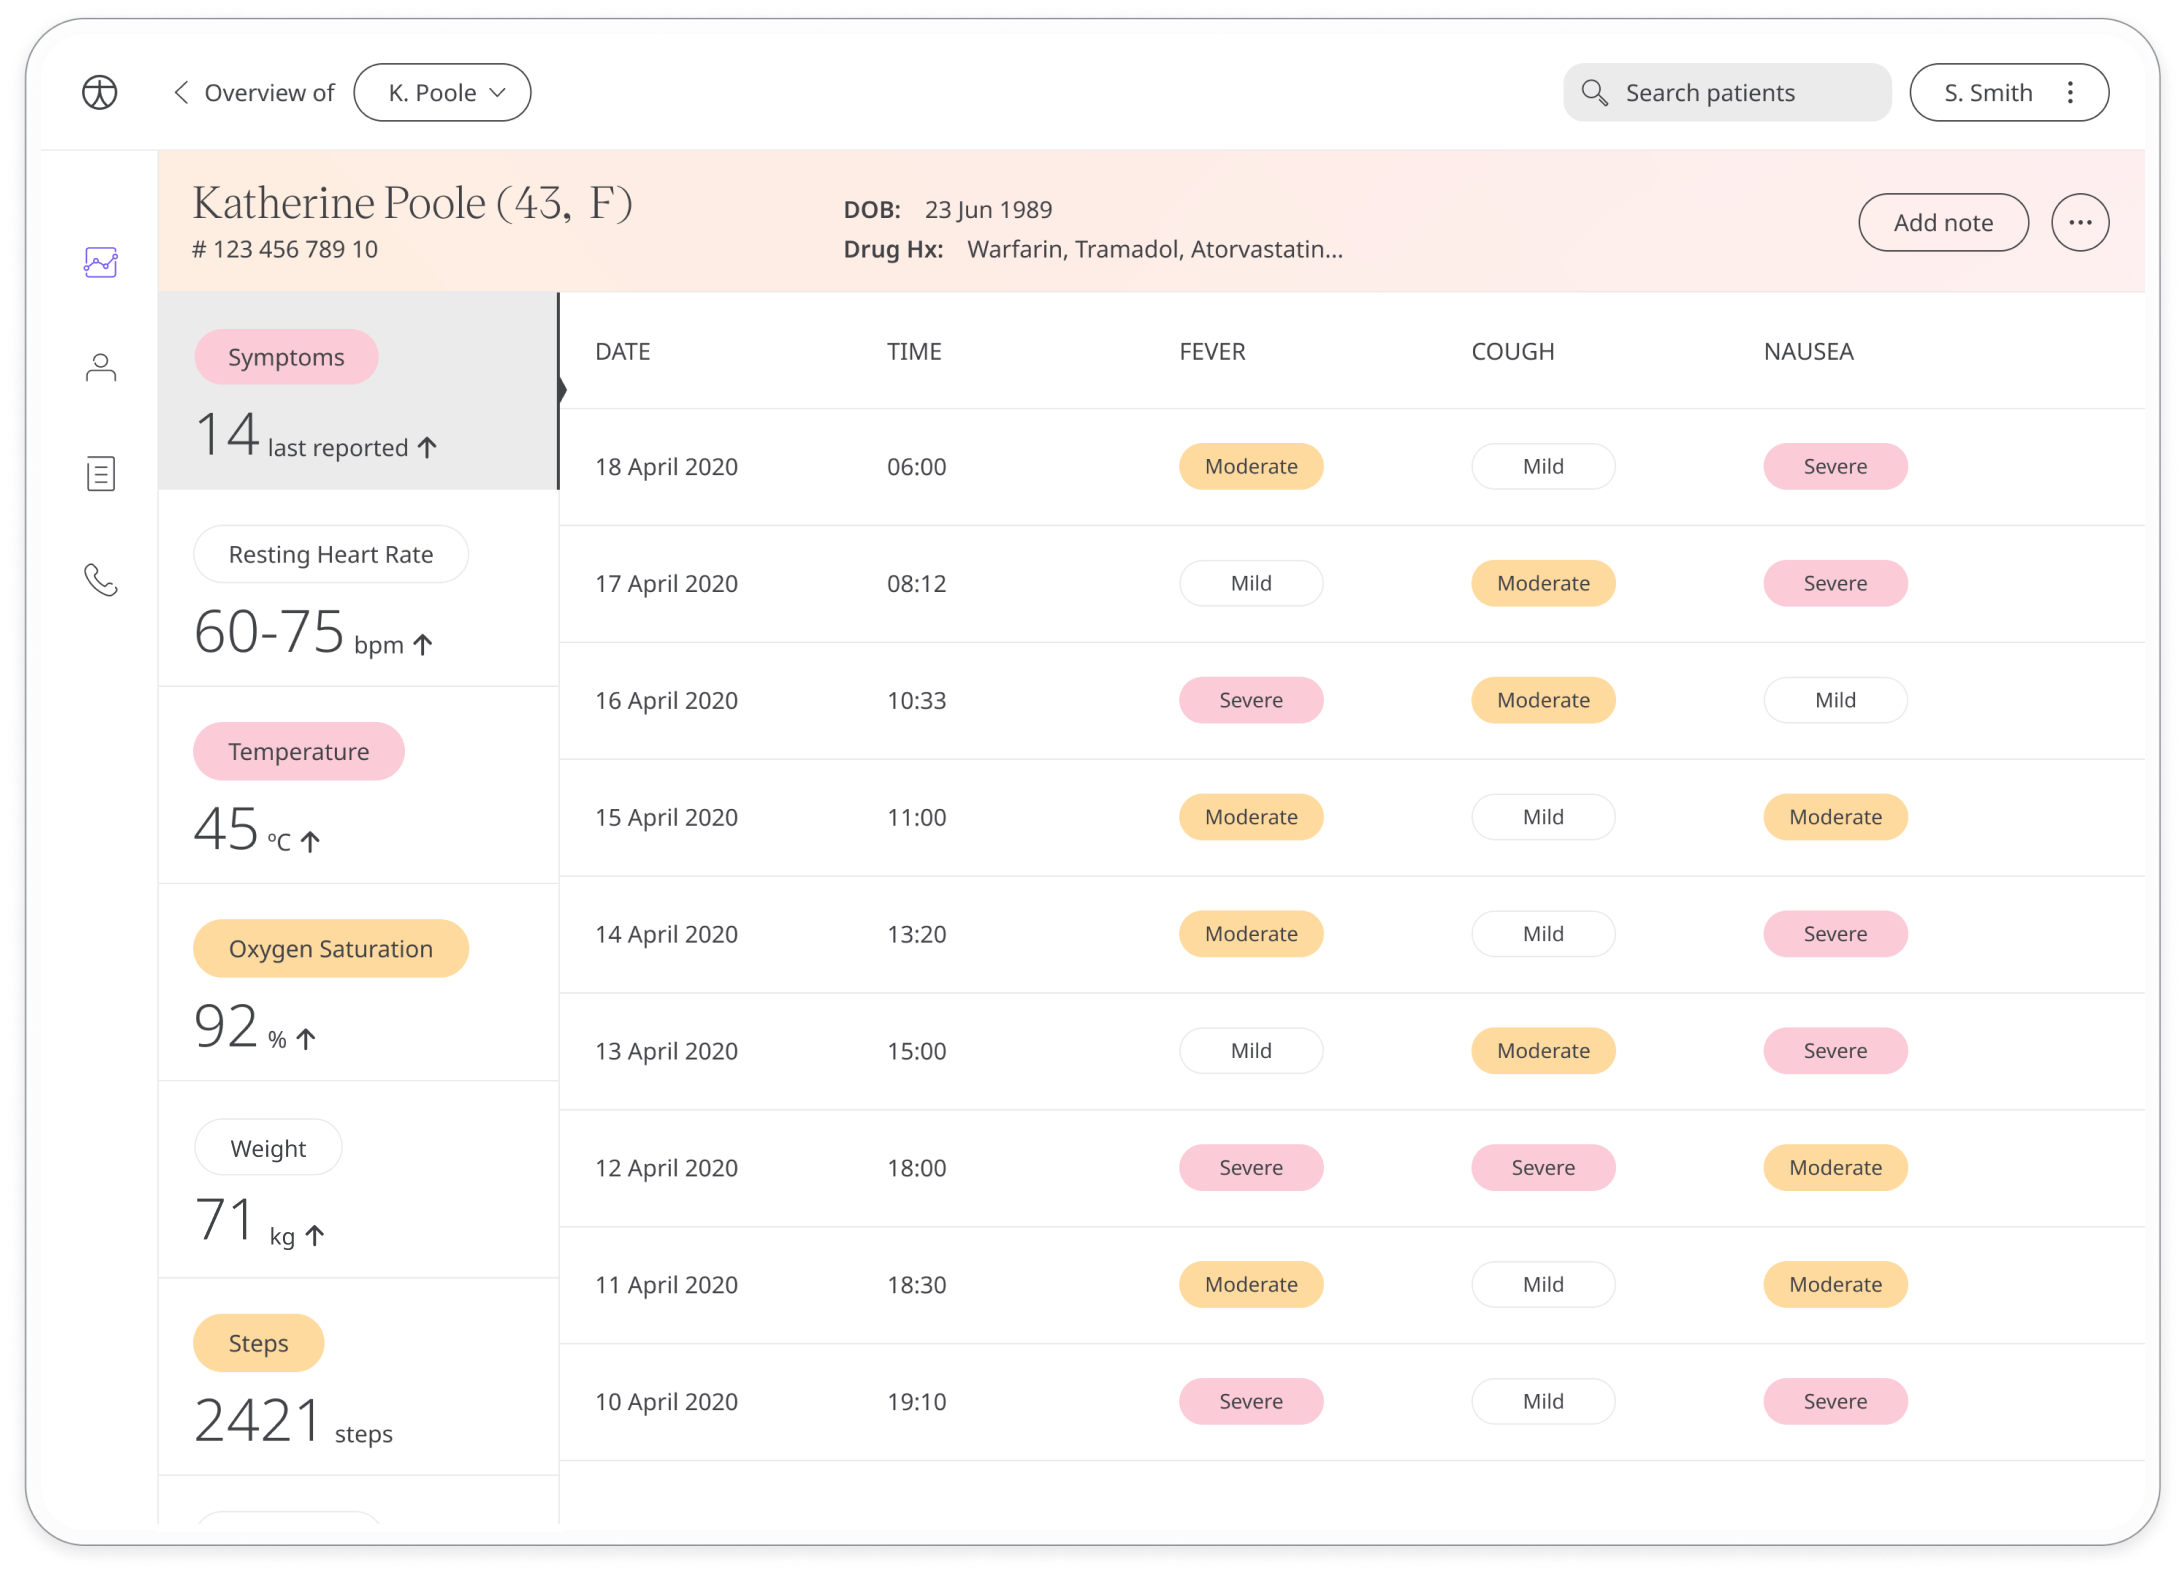
Symptoms
Here, you can review the symptoms reported by the patient with time/date stamps and severity grading. You can scroll down the table to see the evolution of each individual symptom over time.
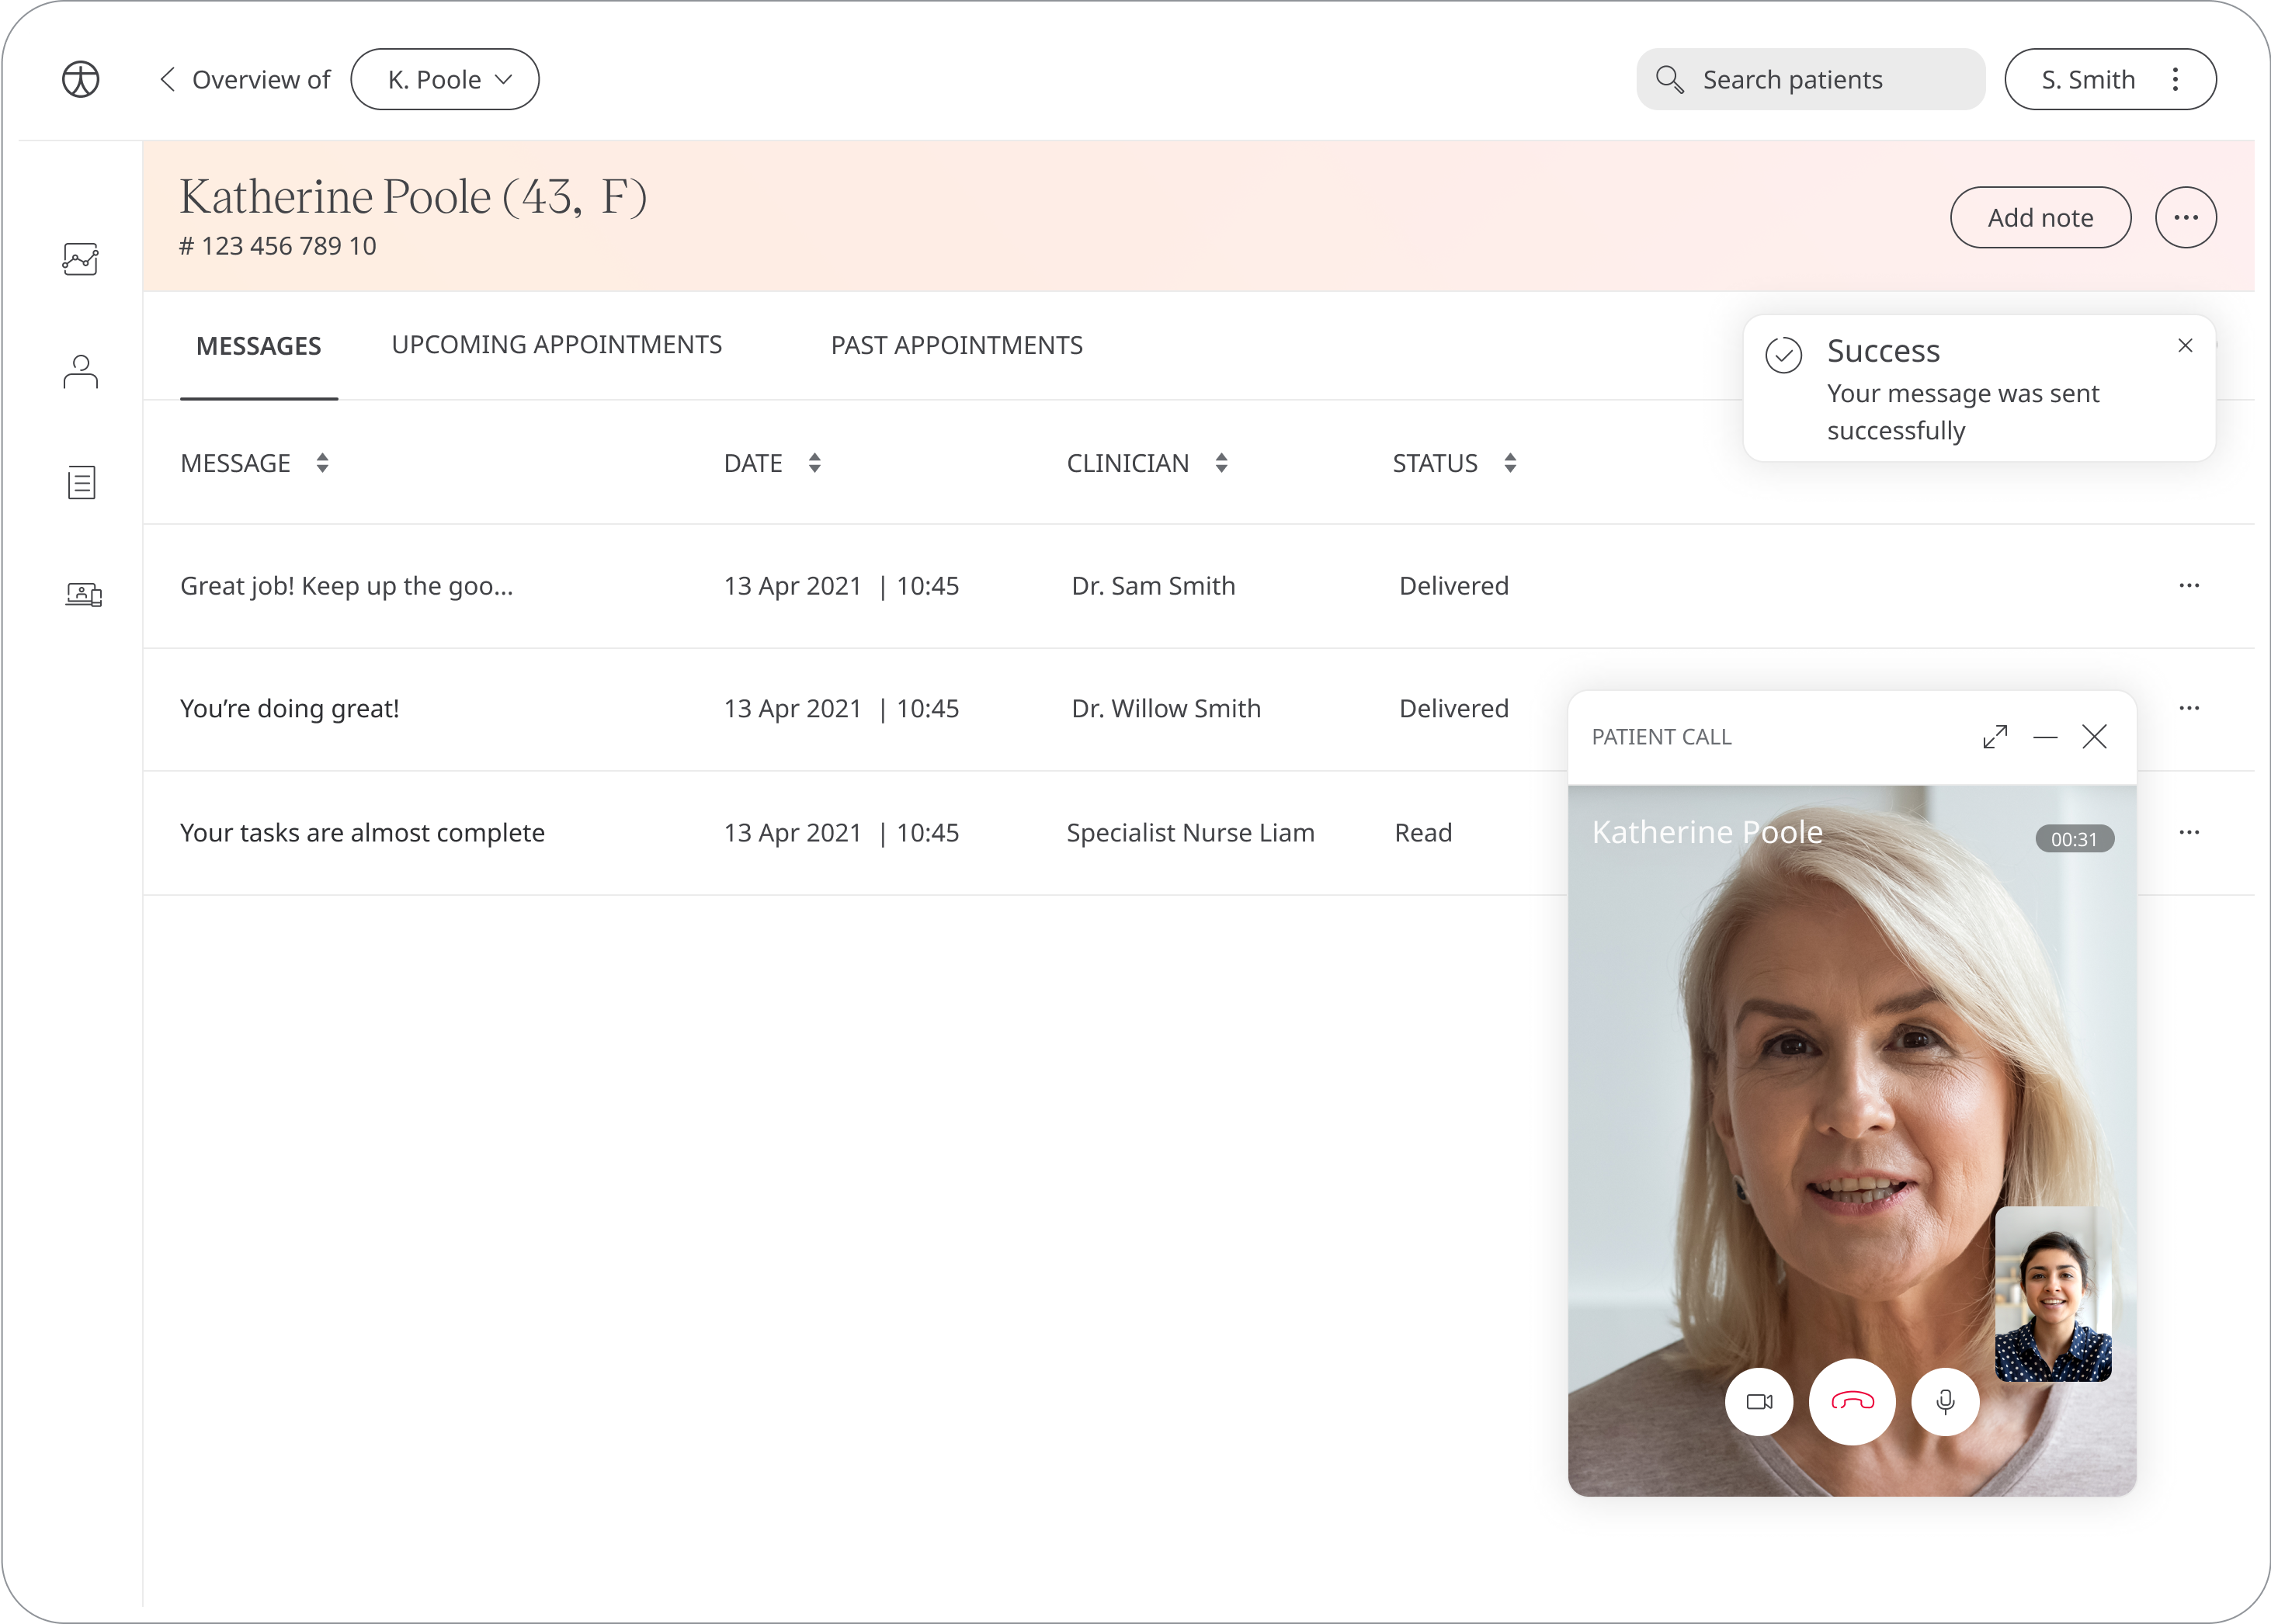
Telemedicine
You can call the patient directly from the dashboard at any time. To do so, click the ‘call patient’ button at the top right corner of the portal, then click confirm on the pop-up window. To enable calls, make sure your browser settings allow camera and microphone use.
Patients can accept or reject scheduled appointments, this provides patients with more flexibility in appointment scheduling.
You’re able to minimise the window of the call, so you can take notes and view the patient’s data, while continuing the conversation.
Use the button showing a microphone to mute the call, and the button showing a camera to enable the video recording.
You can also review the history of all of the previous calls by clicking on the phone icon on the left-hand side of the panel. Please note that the dashboard will not store unanswered attempts or other unsuccessful calls.